Showing posts with label gift idea. Show all posts

Thursday, October 16, 2014

Boo Petit Cafe Bag

This is the last project we made at my last class.  I love these little bags....food safe, roll down and tuck topper and perfect size.


Stamps: Fall Fest, Skinny Mini
Accessories: Fun Fall Framelits, Tangerine Tango thick baker's twine, Confetti Stars Punch
Colors: Basic Black, Tangerine Tango, Whisper White

Happy Stamping,
Krista


Wednesday, October 15, 2014

Give Thanks Fall Wood Block

I like to make decor items in my classes.  We made this one in my "Fall Fest" class.  

I bought a wood block from Hobby Lobby and stained it.  Then added the spiral flowers, stamped leaves from the Fall Fest stamp set and some gold leaves cut out using the Fun Fall Framelits.  I added some linen thread behind the flowers too.  A 4-1/4"x6-1/4" photo mat was directly adhered to the wood block and the clip holds the photo, recipe card, Bible Verse, etc. 

Here you have it....


 A close up of the flowers....


Don't you want to attend my classes now?!  
Happy Stamping,
~Krista

Tuesday, August 5, 2014

Project Life x SU! Hanging Memories

Creating projects for the Convention Display Boards we were asked to make "out of the box" projects using the Project Life by Stampin' Up! kits.  This is the Everyday Adventure Kit and Accessory Pack.


The only things I used that weren't PLxSU was the Pumpkin Chevron Ribbon, the Skinny Mini Alpha set and some markers for journaling.

I love how this turned out.  I used the 4"x4" cards and some of the accessories from the kit.  Cute, huh!?


I just adhered the Pumpkin Ribbon to the back of each card.  Super fun!  A hanging Memory Keeper!


Happy Stamping,
Krista


Friday, August 1, 2014

Pencil Bag with Project Life Tag

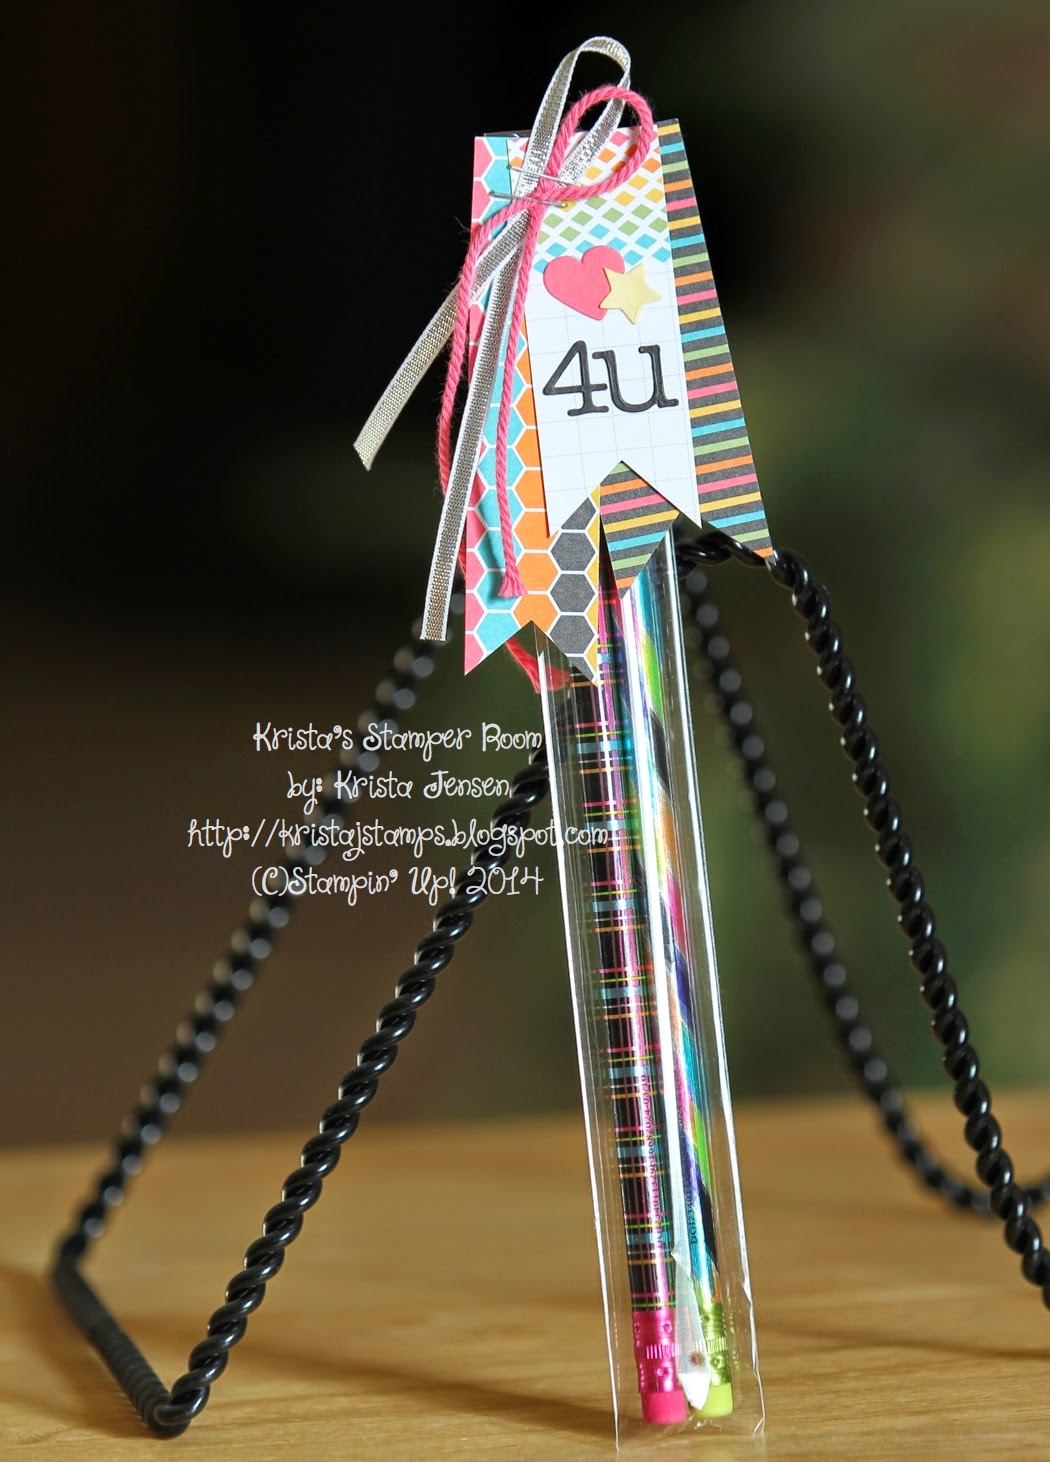
Another project that I made for the display board was a fun 3D using the Everyday Adventure Project Life Pack.  I made this fun tag as a bag topper for pencils.  


I stapled the tag with some bakers twine and silver ribbon. The tag is made from strips of the PL cards.  SO so easy...PL is not just for Memory Keeping!!


This week at Stampin' Celebration it's time for back to school projects.  Let's see what you can come up with!! 


This was a project from the Stampin' Up! Convention 2014.  Don't forget to follow us on Pinterest by clicking on the link below the photo....

http://www.pinterest.com/jentimko/2014-stampin-up-convention-display-stampers/

Happy Stamping,
Krista Jensen

Thursday, July 31, 2014

Give Thanks With Seasonally Scattered

3D PROJECT TIME!!
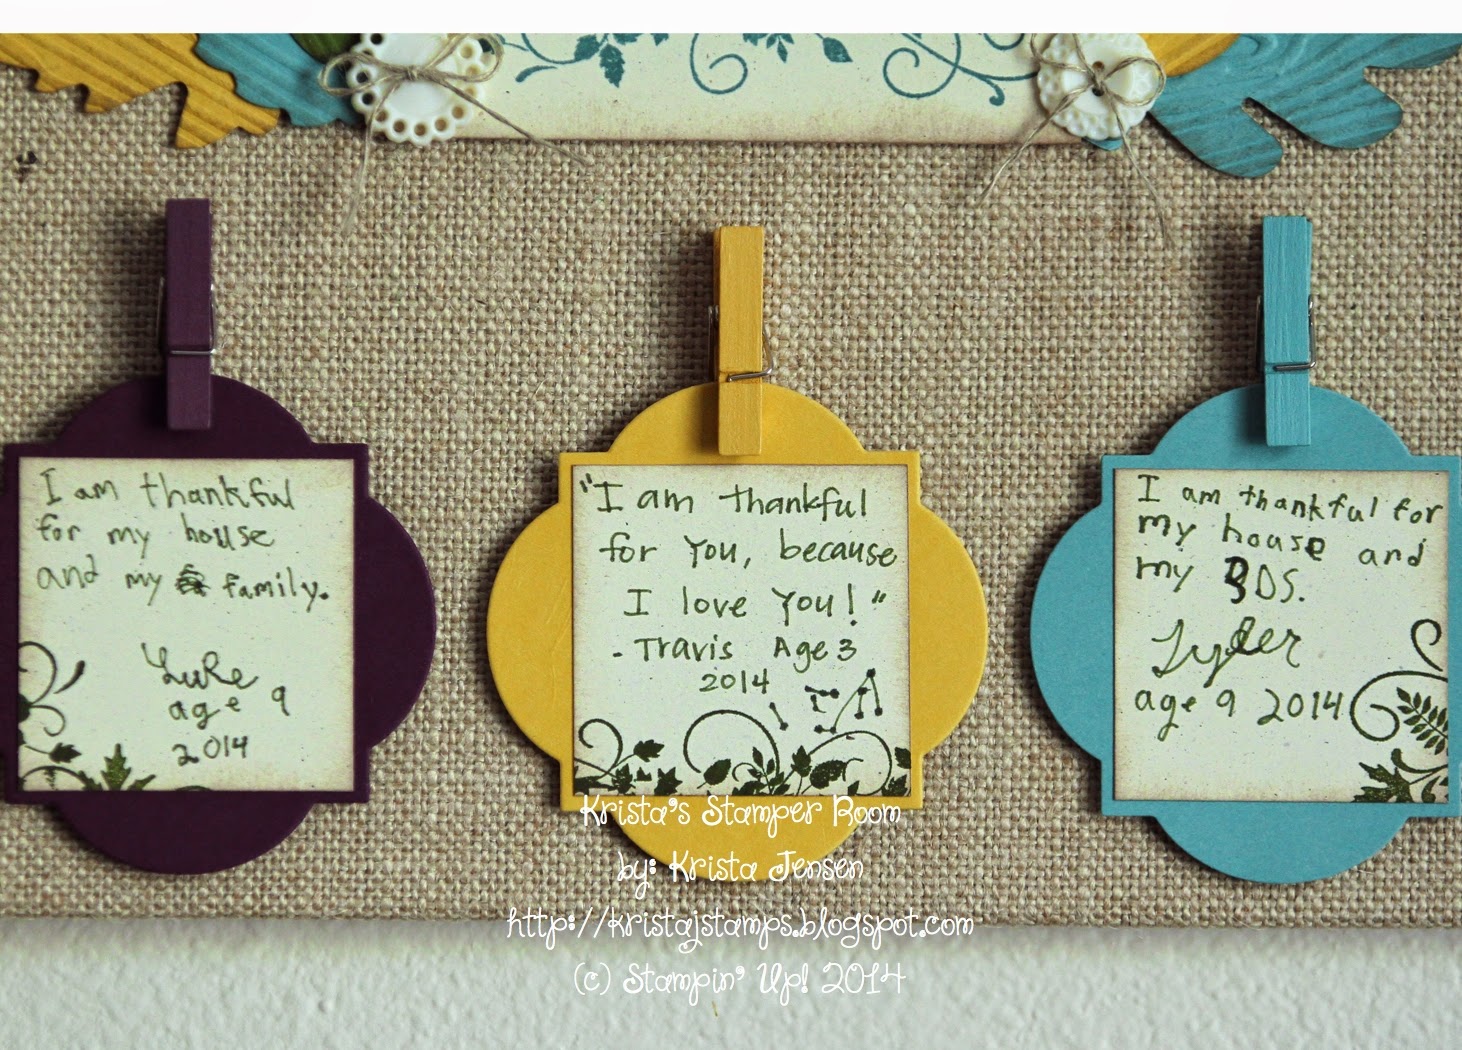
I found a gem at Michaels....Burlap covered FLAT canvases.  Oh my, so cute!  I wanted to use it for a Convention Display Board Sample.  This is what I came up with...a "GIVE THANKS MEMORY KEEPER"


I asked my 3 boys to each write something they are thankful for.  (I wrote the one for Travis, since he's just 3, but he did tell me what to write).
So cute, huh?!  I hot glued the clothespins down and then used them to clip on the little thankful notes.  Each thankful note has a little bit of the "thanks" stamp image.  The backing is a Window Collection Framelit.
I can have the boys write a new note each year and just clip it onto the clothespin.


I used the Autumn Accents Die for the leaves and then embossed them with the Woodgrain Embossing Folder.  Added some Vintage buttons topped with some linen thread.
The "give" is cut from a stamp set in MDS cut out with my Silhouette Cameo.  I stamped the "thanks" image onto Naturals Ivory cardstock and then stamped it again onto Hello Honey.  I hand cut aka "fussy cut" the letters out of the Hello Honey and put it onto the other stamped image to draw more attention to the word.  I sponged the edges with Soft Suede to add a soft look.


These are the boys that wrote these adorable thankful notes:


Make sure you follow all of the Display Stampers on our Pinterest Board. Click HERE for the board.


HAPPY STAMPING,
KRISTA


Sunday, July 27, 2014

Kinda Eclectic Notepad

I love making gifts, especially practical ones.  Who can't use a cute notepad/pen set?!?  I made this little set for the Display Boards at this years Stampin' Up! Convention.  The stamp set is called Kinda Eclectic.


Here is how I made it:
1. Measure your notepad.  Mine was 4"x6"....a scratch pad from Staples.
2. Cut cardstock 6"x 10"
3. Score cardstock at 4", 4-1/4", 9"
4. Crease the first 2 score lines (this is where your notepad will fit into).
5. Fold over and glue down the flap at the 9" score mark.
6. Cut a 3/4"x 3" strip of cardstock and curl it to wrap around the pen.  Make sure it's not too tight so the pen will easily pass through the hole.
7. Glue the strip to leave a hole for the pen then glue that to the back of the notepad.
8. Glue the notepad into the little holder.
9. Decorate up the front of the notepad holder.  Cuteness has arrived!!

**I use Tombo Mono Liquid Glue**

The DSP pictured above is called Lullaby.  Simple project that you can make dozens of...makes a great gift.  SO great that I made some for my roommates at Convention. 

Here they are... I used the same stamp set and no DSP.  I stamped a little more, too.  I LOVE them!! I did fussy cut the leaved out.  Kind of relaxing, if you are in the right mood.


Here is a photo of me and my AWESOME roomies....okay, we didn't all share a room, but we are SU! BFF's!!!

L ro R:  Jane Lee, Stacie Jensen (no we're not related, but we should be), 
Erin Gonzales, Erica Cerwin and Me....the luckiest girl to know these ladies!!


Make sure you follow all of the Display Stampers on our Pinterest Board. Click HERE for the board.


HAPPY STAMPING,
KRISTA JENSEN


Monday, July 21, 2014

Display Board Amazing Birthday Bag

I am so excited...so, SO excited to share with you all of the projects I made for the Stampin' Up! Display Boards at the Convention this year. The first project I am going to share is an altered gift bag.


I used the Amazing Birthday stamp set and the colors are Blackberry Bliss, Very Vanilla and of course, lots of gold.  I measured the front of the bag and cut the cardstock to fit.  I stamped and cut the banners then added a strip of Blackberry ribbon and tucked it behind the cardstock.  I adhered the cardstock to the front of the bag with Tombo Mono Liquid Glue.  I blinged it up with a strip of gold sequins.  The tag is just stamped with Blackberry Bliss on Very Vanilla and I used the tag topper punch for the top of it.  I took the gold bakers twine and tied on some gold sequins, Blackberry stitched satin and vanilla seam binding ribbon.  Easy, easy  project, but looks so beautiful!!

Here's a photo of the whole gang!  I am SO truly honored to be a part of this with these awesome ladies and very talented artists!!


See....it's all for real!  I am still coming off of all of the excitement.  I hope you enjoy all of the goodies we share.  Please make sure you check out all of the gorgeous projects!!

Follow us on Pinterest....click here for the board or cut and paste this link: http://www.pinterest.com/jentimko/2014-stampin-up-convention-display-stampers/


Happy Stamping,
Krista Jensen


Saturday, July 5, 2014

Bookmark...Thanks Pinterest!

I'm not a big color-er...does that make sense?  I usually buy stamps you don't have to color in.  But Stampin' Up! now offers a new product called "Blendabilities".  They are alcohol based markers that come in a 3 pack of the same color....light, medium and dark.  Here is my coloring on these bookmarks.  I was inspired by a pin I saw by "Create with Kaitlyn".  I did change it up a little and added a bit of me on it.


Happy Stamping,
Krista

Tuesday, May 6, 2014

Petite Petals, Sweet Essentials Stack

 This week at Hand Stamped Sentiments it's a color challenge.  We want you to use Tangerine Tango, Coastal Cabana and Baked Brown Sugar.
A friend asked me for some Thank You Notes for her friend that was recently widowed.  I thought this was a wonderful color combo so I made a stack of 12 cards....here is what I came up with...


I used the Petite Petals Stamp set and coordinating punch.  I bet you can't guess what my favorite stamp set is right now?!  Hahaha!
I also used the Sweet Essentials stamp set for the greeting.  The background is with the Gorgeous Grunge stamp set.


Look at this next photo and I mixed it up a bit and changed out a couple of colors on the flowers....do you see it?


Here is the challenge...JOIN US!!  If nothing else, you MUST SEE the designs from our awesome DT!!


Happy Stamping,
Krista


Tuesday, October 8, 2013

Halloween Hello


Here is my spooky version....a little treat carton with a flying witch.  She's in the moonlight.  I know the coloring is bad on this photo...but makes it even more spooky, right?! 


Hop on over to Hand Stamped Sentiments and get stamping!!

Monday, September 9, 2013

Christmas Gift Card Holders

It's all about packaging, right?!  I love making gift card holders for the holidays and birthdays.  This year I am doing a few craft fairs and these sell like hot cakes.  Why not get started making them now?!

I used the colors for the challenge this week at Hand Stamped Sentiments. They are Raspberry Ripple, Gumball Green and Baked Brown Sugar.  These colors scream Christmas...a very yummy Christmas!!


When Closed, these gift card holders measure 4-1/4" x 3-1/4".  The fun thing is that you can decorate these for any occasion with just about any stamp set...they are the perfect size!!


Here is a photo from the top of them.  I wrap and adhere the ribbon to the center that way it doesn't slide off it.  It also closes very nicely...easily fitting inside an envelope if you'd like.
Here's how to score it:
Take an 11" x 4-1/4" piece of cardstock.  
Score at 3-1/4", 5-1/2" and 7-3/4"
Crease into a "W" shape....


Here is a photo of where the gift card fits in. 
Using the Word Window punch, make 2 punches side by side at the center fold only cutting 1/2 of the window shape.  The center of the fold will still have to be cut.
You can use any shape.  I used the new Label Bracket Punch to punch out the center (between the 2 window punch cuts).

When you adhere the "W" shape...just make a thin line of glue around just the edges that need to be adhered so you can leave space for the gift card to slide into.
Fun stuff!!  A great way to present someone special with a gift card!!


Here is the challenge stampers....get on over there and join us at Hand Stamped Sentiments!!


Happy Stamping,
Krista Jensen


Tuesday, March 12, 2013

Gift Set


This week at Hand Stamped Sentiments we are doing a color challenge.  I love these bright colors....so many possibilities.  I decided to make an altered notepad and pen set. 


This is the inside....I used a Staples brand notepad that measures 8" x 5" and added a strip of DSP to cover the label.


Here is a closeup of the paper flower.  I used both the large and small scallop circle.  I wet them, crunched them up then layered them up and got this look: 


Instructions on making the notepad/pen set:
Score an 8" x 12" sheet of cardstock at 5", 5 1/4", and 11".
Fold in the 11" score line and adhere down.
Crease the other 2 scores and this should be the perfect size for the notepad.
I made a 1" loop for the pen and adhered it to the NOTEPAD then glued the NOTEPAD down into the folded cardstock cover.
Decorate it all up as you like....easy gift set!!

Happy Stamping,
Krista

Sunday, January 20, 2013

Lollipop Favor

I've said it before and I'll say it again....I love the Design Team at Hand Stamped Sentiments!!  They are such a fun and talented group of ladies.  
Today I created a project from my friend Erica's tutorial that I purchased.  Click here to purchase this FABULOUS tutorial with some awesome projects!!

This is one of the projects from that tutorial....I did make a couple of adjustments because I didn't have all of the supplies.  Cute, right?!


I used the Scallop Envelope Die and the Doily Die to make the lollipop holder.  Then I used the Hearts A Flutter stamp set and the the coordinating Framelits.  Tied it all off with Real Red and Pool Party Ribbon.  
I got the lollipop at WalMart.  They were 10 for $1.  WOO HOO!

Happy Stamping,
Krista

P.S. This is one of the projects for one of my upcoming classes.  

Thursday, January 17, 2013

Top of the Bag To Ya

I am busy creating some fun projects for my upcoming classes....4 of them to be exact.  I wanted them to all be a little different.  Here is a fun Small Cello Bag with a topper.  I used the largest Framelit from the Labels Collection and folded it over the top of the bag.  


Don't know if you can see them.....but check out the little Rhinestones on the stamped image and the little hearts dangling from the twine.
This is a quick and easy project for any occasion, but you know I love Valentine's Day!!

I used the You Are Loved Stamp Set.

Happy Stamping,
Krista

Monday, January 14, 2013

Fancy Valentine Favor

I always like to make things to give to my kids' teachers.  This Valentine's Day we will be off track...this means we will be on a break from school.  So I need to get moving and make something before February 1st.  This is what I came up with using the Fancy Favor Die.


I will fill it up with some little goodies.
Here is a close up shot of the front.  I used the stamps sets called Hearts a Flutter and That's the Ticket.  I love to add a little sparkle and what better way than with our yummy glitter paper?!  Top it all off with the Whisper White Organza ribbon.  So cute!


If you plan to attend this month's Valentine's Day Class you will be making this Fancy Favor Box.

Happy Stamping!
Krista

Wednesday, November 7, 2012

Christmas Gift Card Holder

I really like making gift card holders, but the bad thing is, I find myself never giving them away.  I like to buy gifts because I like wrapping presents in boxes.  I know, weird, but I think it's fun to shop for people and to wrap them up all pretty.  :)
This is a gift card holder that we made at my demonstrator downline meeting this past week.  I really like the simplicity of it, but I also love the bright colors.


So, here's how you do it:
1. Take a 4 1/4" x 11" sheet of cardstock and score at 3 1/4", 5 1/2" and 7 3/4"
2. Fold it into a "W" shape 
3. Using the Word Window punch...punch out 2 times side by side, but only slide the paper in so only 1/2 of the window is punched out.  See photo below:


4.  Take a 1" circle punch and punch a half circle out in the center.  See above photo.
5.  Adhere the center fold so the gift card won't slide out.
6.  Decorate up the front and attach a ribbon to tie closed.  


I need to be better about taking photos of each of these steps.  Please comment below if you have questions. These are so super easy...anyone will love it!!

Happy Stamping,
Krista

Tuesday, November 6, 2012

Fall Gift Giving

I bet you can't guess what this is?


If you guessed a gift card holder, then you're right!!  I like to whip these out by the dozens over Christmas time.  But I thought it would be fun to do a fall themed one.

I'm loving the new Autumn Accents Die.  I cut a couple of them out in Old Olive, Elegant Eggplant and More Mustard.  Then I took the Vintage Jumbo Wheel over the background then used my blender pen to add some color with the matching inks to the leaves.  Add a button and a tag then you're done!

Here is what the middle looks like:


Stop by here (my blog) tomorrow for the step by step instructions on how to make this!


But first, hop on over to Hand Stamped Sentiments this week to join us for a color challenge and check out the other fun creations.

Happy Stamping,
Krista