Showing posts with label 3D. Show all posts

Thursday, October 16, 2014

Boo Petit Cafe Bag

This is the last project we made at my last class.  I love these little bags....food safe, roll down and tuck topper and perfect size.


Stamps: Fall Fest, Skinny Mini
Accessories: Fun Fall Framelits, Tangerine Tango thick baker's twine, Confetti Stars Punch
Colors: Basic Black, Tangerine Tango, Whisper White

Happy Stamping,
Krista


Wednesday, October 15, 2014

Give Thanks Fall Wood Block

I like to make decor items in my classes.  We made this one in my "Fall Fest" class.  

I bought a wood block from Hobby Lobby and stained it.  Then added the spiral flowers, stamped leaves from the Fall Fest stamp set and some gold leaves cut out using the Fun Fall Framelits.  I added some linen thread behind the flowers too.  A 4-1/4"x6-1/4" photo mat was directly adhered to the wood block and the clip holds the photo, recipe card, Bible Verse, etc. 

Here you have it....


 A close up of the flowers....


Don't you want to attend my classes now?!  
Happy Stamping,
~Krista

Thursday, August 21, 2014

Canvas Mounted Scrapbook Page, Kinda Eclectic

You know those projects you make that you just fall in love with?  Well this is one of them for me.  The bright colors, the bits of sparkle and my cute family all mounted on to an 8"x10" canvas.
Love it!


I used the Sweet Taffy DSP with Daffodil Delight cardstock for the base.  I stamped the starburst image on the Daffodil Delight cardstock with Versamark and then embossed it with clear embossing powder.  I made a Melon Mambo spiral flower.  Stamped more of the Kinda Eclectic images and cut them out.  On the flower I attached strands of ribbon, sequins and bakers twine.  Pearls on the butterfly too. I added the tiny punched flowers with pearls and there you have it.

Mounting the page onto the canvas:
BEFORE you add ANY embellishments, use mod podge all over the canvas in a thin layer.  Softly press the base of the page onto the canvas.  Curl and press the edges on too.  Turn the canvas over and flatten and press with your hands to smooth out the page base cardstock.  

After it's all dried, then go back and add the embellishments.


Happy Stamping!
Krista


Tuesday, August 5, 2014

Project Life x SU! Hanging Memories

Creating projects for the Convention Display Boards we were asked to make "out of the box" projects using the Project Life by Stampin' Up! kits.  This is the Everyday Adventure Kit and Accessory Pack.


The only things I used that weren't PLxSU was the Pumpkin Chevron Ribbon, the Skinny Mini Alpha set and some markers for journaling.

I love how this turned out.  I used the 4"x4" cards and some of the accessories from the kit.  Cute, huh!?


I just adhered the Pumpkin Ribbon to the back of each card.  Super fun!  A hanging Memory Keeper!


Happy Stamping,
Krista


Friday, August 1, 2014

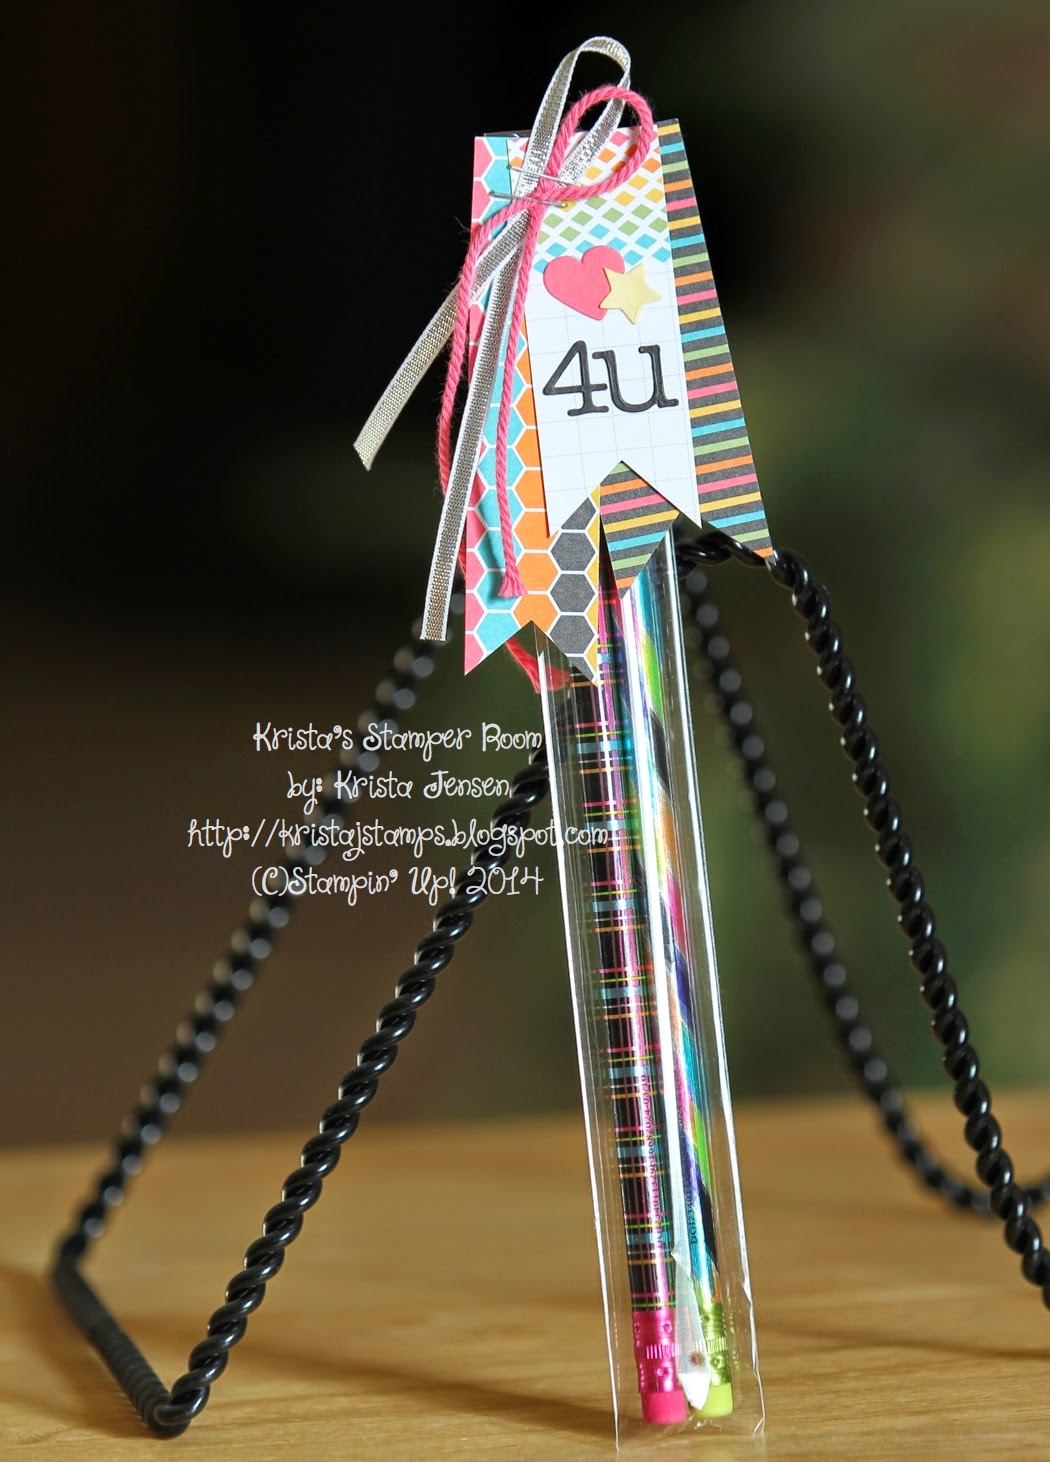
Pencil Bag with Project Life Tag

Another project that I made for the display board was a fun 3D using the Everyday Adventure Project Life Pack.  I made this fun tag as a bag topper for pencils.  


I stapled the tag with some bakers twine and silver ribbon. The tag is made from strips of the PL cards.  SO so easy...PL is not just for Memory Keeping!!


This week at Stampin' Celebration it's time for back to school projects.  Let's see what you can come up with!! 


This was a project from the Stampin' Up! Convention 2014.  Don't forget to follow us on Pinterest by clicking on the link below the photo....

http://www.pinterest.com/jentimko/2014-stampin-up-convention-display-stampers/

Happy Stamping,
Krista Jensen

Thursday, July 31, 2014

Give Thanks With Seasonally Scattered

3D PROJECT TIME!!
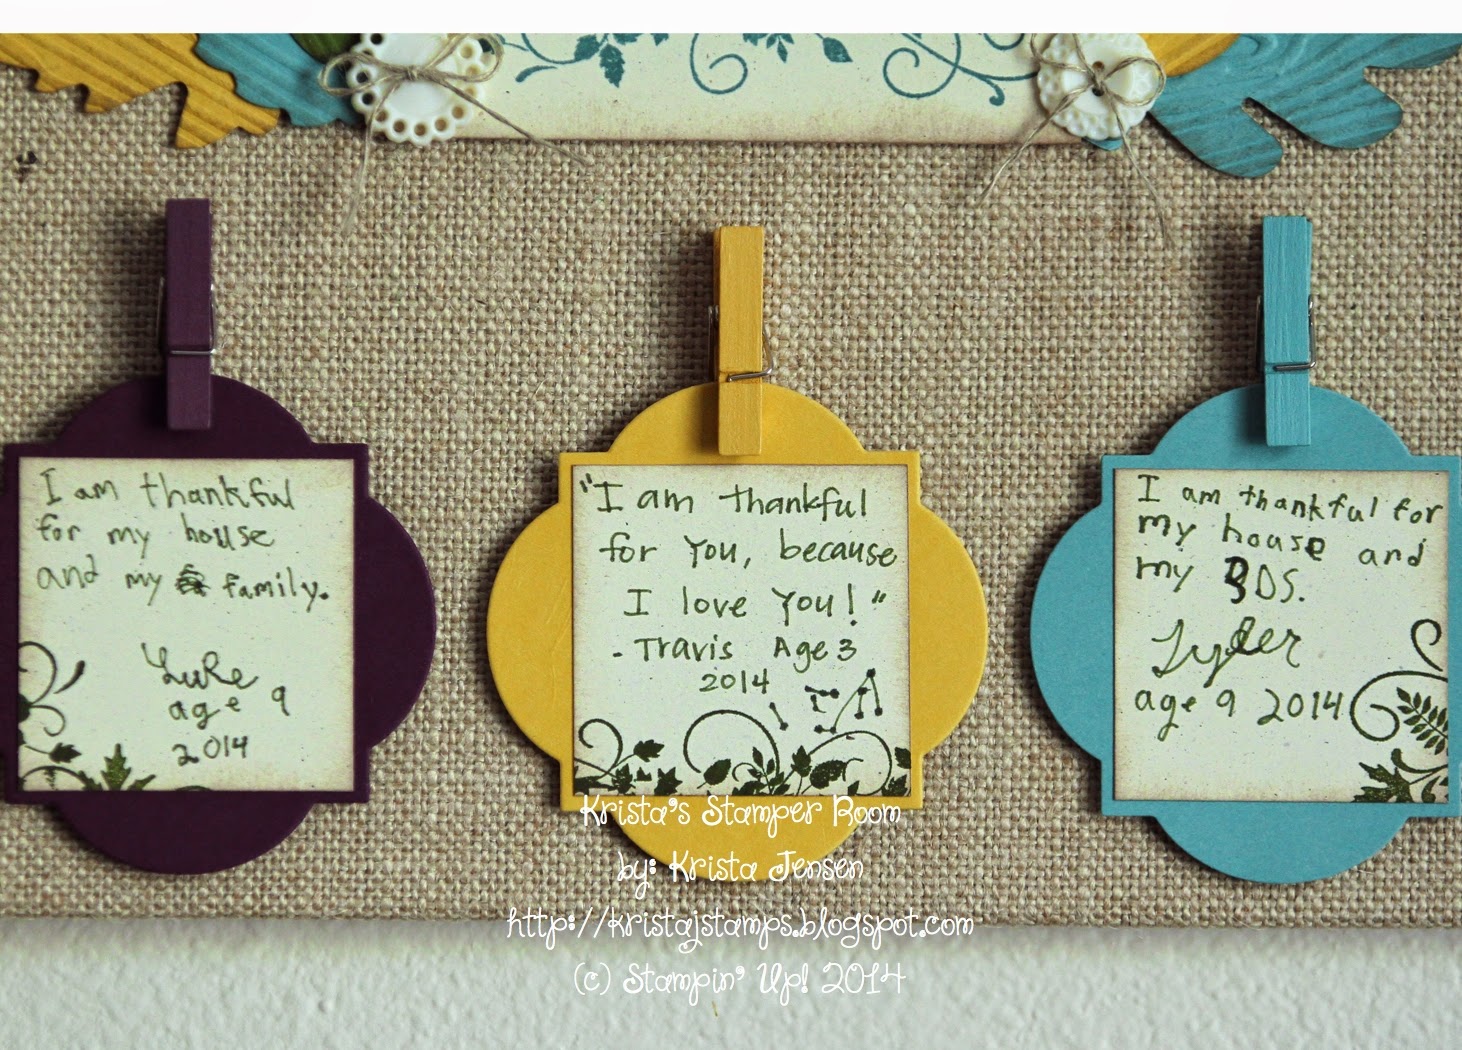
I found a gem at Michaels....Burlap covered FLAT canvases.  Oh my, so cute!  I wanted to use it for a Convention Display Board Sample.  This is what I came up with...a "GIVE THANKS MEMORY KEEPER"


I asked my 3 boys to each write something they are thankful for.  (I wrote the one for Travis, since he's just 3, but he did tell me what to write).
So cute, huh?!  I hot glued the clothespins down and then used them to clip on the little thankful notes.  Each thankful note has a little bit of the "thanks" stamp image.  The backing is a Window Collection Framelit.
I can have the boys write a new note each year and just clip it onto the clothespin.


I used the Autumn Accents Die for the leaves and then embossed them with the Woodgrain Embossing Folder.  Added some Vintage buttons topped with some linen thread.
The "give" is cut from a stamp set in MDS cut out with my Silhouette Cameo.  I stamped the "thanks" image onto Naturals Ivory cardstock and then stamped it again onto Hello Honey.  I hand cut aka "fussy cut" the letters out of the Hello Honey and put it onto the other stamped image to draw more attention to the word.  I sponged the edges with Soft Suede to add a soft look.


These are the boys that wrote these adorable thankful notes:


Make sure you follow all of the Display Stampers on our Pinterest Board. Click HERE for the board.


HAPPY STAMPING,
KRISTA


Wednesday, July 30, 2014

Love Seasonally Scattered Part 2

I think this card was quite clever. Don't ya think?!  This one was on the Display Board at the Stampin' Up! Convention.  Woot!!


To make the "LOVE" cloud:
1. Stamp image in Pool Party ink on Whisper White Cardstock.
2. Randomly, free-hand cut out stamped image into the shape of a cloud.
3.  Lay the cut out image over Silver Foil Paper...following the same pattern of the cloud, cut around it
leaving at least a 1/8" edge so it gives a layered look.
There you have it....EVERY CLOUD HAS A SILVER LINING!!  

To make the Background:
1.  Cut one edge of a piece of heavy cardstock or the packaging for your DSP into a random scalloped edge.
2.  Ink up a sponge with the Pool Party ink pad.
3. Lay the template onto your card front...toward the top of your card and start sponging just along the edges of the template. 
4. Slide the template down and shift to one side then sponge it again.
5.  Continue sponging the entire cardfront until you get the look you want.

To make the tiny 3D hearts:
1.  Punch out 3 tiny hearts from the Itty Bitty Accents Punch Pack for each of the hanging hearts.
2. Crease each heart in half.
3. Adhere one heart flap to another one...using 3 for each 3D heart.
4. Glue it down where you'd want it.

I hope the instructions make sense.  I will do my best to answer any questions you have in the comments section.  Or you can email me at kristajstamps@gmail.com
I guess it's time for me to breakdown and start making some video tutorials.  LOL!


Make sure you follow all of the Display Stampers on our Pinterest Board. Click HERE for the board.  


Sunday, July 27, 2014

Kinda Eclectic Notepad

I love making gifts, especially practical ones.  Who can't use a cute notepad/pen set?!?  I made this little set for the Display Boards at this years Stampin' Up! Convention.  The stamp set is called Kinda Eclectic.


Here is how I made it:
1. Measure your notepad.  Mine was 4"x6"....a scratch pad from Staples.
2. Cut cardstock 6"x 10"
3. Score cardstock at 4", 4-1/4", 9"
4. Crease the first 2 score lines (this is where your notepad will fit into).
5. Fold over and glue down the flap at the 9" score mark.
6. Cut a 3/4"x 3" strip of cardstock and curl it to wrap around the pen.  Make sure it's not too tight so the pen will easily pass through the hole.
7. Glue the strip to leave a hole for the pen then glue that to the back of the notepad.
8. Glue the notepad into the little holder.
9. Decorate up the front of the notepad holder.  Cuteness has arrived!!

**I use Tombo Mono Liquid Glue**

The DSP pictured above is called Lullaby.  Simple project that you can make dozens of...makes a great gift.  SO great that I made some for my roommates at Convention. 

Here they are... I used the same stamp set and no DSP.  I stamped a little more, too.  I LOVE them!! I did fussy cut the leaved out.  Kind of relaxing, if you are in the right mood.


Here is a photo of me and my AWESOME roomies....okay, we didn't all share a room, but we are SU! BFF's!!!

L ro R:  Jane Lee, Stacie Jensen (no we're not related, but we should be), 
Erin Gonzales, Erica Cerwin and Me....the luckiest girl to know these ladies!!


Make sure you follow all of the Display Stampers on our Pinterest Board. Click HERE for the board.


HAPPY STAMPING,
KRISTA JENSEN


Monday, July 21, 2014

Display Board Amazing Birthday Bag

I am so excited...so, SO excited to share with you all of the projects I made for the Stampin' Up! Display Boards at the Convention this year. The first project I am going to share is an altered gift bag.


I used the Amazing Birthday stamp set and the colors are Blackberry Bliss, Very Vanilla and of course, lots of gold.  I measured the front of the bag and cut the cardstock to fit.  I stamped and cut the banners then added a strip of Blackberry ribbon and tucked it behind the cardstock.  I adhered the cardstock to the front of the bag with Tombo Mono Liquid Glue.  I blinged it up with a strip of gold sequins.  The tag is just stamped with Blackberry Bliss on Very Vanilla and I used the tag topper punch for the top of it.  I took the gold bakers twine and tied on some gold sequins, Blackberry stitched satin and vanilla seam binding ribbon.  Easy, easy  project, but looks so beautiful!!

Here's a photo of the whole gang!  I am SO truly honored to be a part of this with these awesome ladies and very talented artists!!


See....it's all for real!  I am still coming off of all of the excitement.  I hope you enjoy all of the goodies we share.  Please make sure you check out all of the gorgeous projects!!

Follow us on Pinterest....click here for the board or cut and paste this link: http://www.pinterest.com/jentimko/2014-stampin-up-convention-display-stampers/


Happy Stamping,
Krista Jensen


Tuesday, April 1, 2014

Oma and Opa Scrapbook Page

Be inspired this month at Stampin' Celebration!  Here are some beautiful pictures to help you!!


I immediately thought these photos would make a gorgeous scrapbook page.  I'm really loving everything GOLD right now.  I found this awesome picture of my Grandparents taken just a month ago.  Aren't they cute?!  I am truly blessed to have them!!  I can't wait to frame this!!  Soon I will be making one for my other set of grandparents....YES I still have them in my life, too!!  I am one truly blessed granddaughter!!


Here are some close ups of those lovely flowers...see the sanding on the "core-dinations" cardstock?!


Ingredients...
Colors: Baked Brown Sugar, Soft Suede, Early Espresso, Sahara Sand, Very Vanilla
Stamps:  Off The Grid, Fabulous Florets
Accessories: Gold foil paper, core-dinations cardstock, gold sequins, gold embossing powder, pearls, Victoria crochet trim.

Don't recognize the leaves as a die cut?  Well....it's actually a stamp image on MDS from the Betsy's Blossom stamp set.  I used my Silhouette Cameo to enlarge the image and cut it out.  Cool, huh?!?

Happy Stamping,
Krista

Saturday, March 1, 2014

Celebrate at Stampin' Celebration

The inspiration photos this week at Stampin' Celebration are so soft and pretty!!  


I wanted to use a little bit of each photo to inspire my project.  I found these cute little clear pillow boxes at Clearbags.com.  And they were on clearance!  Even better!!


I added some really cool Spiral Flower Die cut flowers in Wisteria Wonder, and a fringe scissor cut leafy thing...hee hee. Then some of the Petite Petals punched flowers in White and a cute celebrate banner.  For the belly band I cut a 2"x7-1/2" then used the Tag Topper punch to finish the edges and to tie it together with the taffeta ribbon.

Tuesday, December 31, 2013

Nature Love Valentine Card

Christmas is over and the New Year is almost here.  That means countdown to Valentine's Day.  It's my favorite holiday...I love the colors, I love making the cool treats for everyone, but most of all, it's my hubby's Birthday.  :)

Join us this week at Hand Stamped Sentiments #176 for a cute inspiration challenge....
Here is the photo....


Here is my take on the inspiration photo....


Close up of the double bow and the 5 hearts folded and glued together to make this super fun 3D heart.


I also used the Core-dinations paper with the Woodgrain Embossing Folder.  Fun, right?!

Happy Stamping,
Krista


Tuesday, October 22, 2013

Holly Jolly Christmas

It's time for a new challenge at Hand Stamped Sentiments.  This week it's a sketch.  The possibilities are endless with this one for sure!! Have fun with it and join us this week!!


Here is my take.  I did 3 layers of ribbon, a rosette with a stamped/embossed image from the set Tags 4 You and topped it off with some "core-dinations" cardstock, embossed and sanded.


Be sure to stop by Hand Stamped Sentiments and check out the other Design Team's creations!!

Happy Stamping,
Krista

Tuesday, October 8, 2013

Halloween Hello


Here is my spooky version....a little treat carton with a flying witch.  She's in the moonlight.  I know the coloring is bad on this photo...but makes it even more spooky, right?! 


Hop on over to Hand Stamped Sentiments and get stamping!!

Monday, September 9, 2013

Christmas Gift Card Holders

It's all about packaging, right?!  I love making gift card holders for the holidays and birthdays.  This year I am doing a few craft fairs and these sell like hot cakes.  Why not get started making them now?!

I used the colors for the challenge this week at Hand Stamped Sentiments. They are Raspberry Ripple, Gumball Green and Baked Brown Sugar.  These colors scream Christmas...a very yummy Christmas!!


When Closed, these gift card holders measure 4-1/4" x 3-1/4".  The fun thing is that you can decorate these for any occasion with just about any stamp set...they are the perfect size!!


Here is a photo from the top of them.  I wrap and adhere the ribbon to the center that way it doesn't slide off it.  It also closes very nicely...easily fitting inside an envelope if you'd like.
Here's how to score it:
Take an 11" x 4-1/4" piece of cardstock.  
Score at 3-1/4", 5-1/2" and 7-3/4"
Crease into a "W" shape....


Here is a photo of where the gift card fits in. 
Using the Word Window punch, make 2 punches side by side at the center fold only cutting 1/2 of the window shape.  The center of the fold will still have to be cut.
You can use any shape.  I used the new Label Bracket Punch to punch out the center (between the 2 window punch cuts).

When you adhere the "W" shape...just make a thin line of glue around just the edges that need to be adhered so you can leave space for the gift card to slide into.
Fun stuff!!  A great way to present someone special with a gift card!!


Here is the challenge stampers....get on over there and join us at Hand Stamped Sentiments!!


Happy Stamping,
Krista Jensen


Monday, August 12, 2013

Favorite Things Party Banner

Have you ever heard of it?  Well, I never did until my cousin Lindsay was posting all of these cute things on Pinterest.  I had to check it out and I asked her what it was all about. Here's how it works:
Invite your friends over for a get together.
Have them bring 3 of the same item (brand new)...something that is their favorite thing.  A lipgloss, kitchen utensil, home item, accessory...anything. 
Set a dollar limit for this item. I chose to ask everyone to spend no more than $10 per item.  REMEMBER...they are each bringing THREE of the SAME item.
Once they arrive they will write their name on 3 slips of paper and drop them in the jar.
When everyone is here and all names are collected, everyone will draw 3 names (not their own of course!)
Each person will stand up, describe their favorite thing, and then give their favorite thing to those people they drew from the jar.
Sounds like fun, right?! I HAD to make a banner for this fun girls night.  It's all about the details!!!

My party is this Friday. I will let you know how it goes.  I'm sure it will be lots of fun since it's with some pretty cool ladies!!


Every time I see this banner I burst into song....."These are a few of my Favorite Things!!"  You know, Sound of Music?!?!  It's a classic!!

Here are some close up shots.  I'm not fond of the coloring in these photos....sorry about that!!


I found inspiration for this project on a fabulous challenge blog...
NOW....
Hop on over to Stampin' Celebration Inspiration Challenge and check out the other gorgeous ideas from the Design Team and the other entries.


Happy Stamping,
Krista